| |

| Challenge | Requirements
| Supplies | Promotion | Subwoofer
| Photos | Reviews
| ASP | FAQ | Revision
0.1 | Revision 2 | ORION-3 |
ORION-4 |
ORION-5 |
B u i l d t h i s u n i q u
e l o u d s p e a k e r y o u r s e l f o r l e t
u s b u i l d i t f o r y o u
What is involved in building the ORION?
The following 12 steps, required for constructing an ORION
loudspeaker system, will give you an idea of the size of the project.
They might help
you decide whether you have the skills to build the ORION yourself or to buy ORION-4 from Wood Artistry.
Building the ORION is a challenge that hundreds all over the world have
successfully taken. I provide a wealth of information on this website, in the
construction documentation and with on-line updates, but I cannot help you
individually. The ORION-PLUTO-Users-Group
is the place where builders help each other. You can ask for access to the
forum's resource pages after you have purchased the Construction Plans.
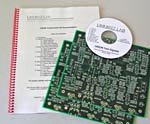 |
1 - Purchase Construction Plans,
which provide detailed
information about cabinet construction, electronic parts and materials to
order, circuit board assembly and test, speaker assembly and test, and
system test. Up-to-date information is found on the Supplemental
Information pages.
Supplies |
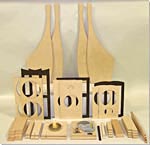 |
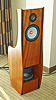
2 - Cut out wooden parts according to
their drawings. A template is made first for outlining the curved side panels. The
cabinet is assembled with screws and glue.
* Alternatively, Wood Artistry can provide an
ORION-4 kit.* |
 |
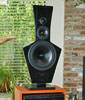
3 - Assemble and finish the cabinet with
paint or wood stain and varnish. Technique and materials are your choice.
- Grill cloth is attached to separate frames.
* This step is also required for the ORION-4 Kit
from Wood Artistry.*
|
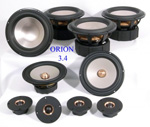 |
4 - Purchase woofer, midrange and tweeter drivers
from Madisound or other supplier.
- Parts information is provided with the Construction Plans.
|
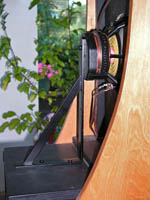 |
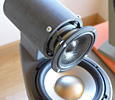
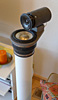
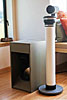
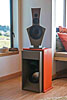
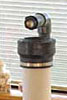
5 - Screw the drivers into the cabinet baffle except for the midrange driver, which is
magnet mounted similar to Revision 0.1 of the
ORION.
- Design your own mounting scheme
for decoupling the driver from the baffle or use the Wood Artistry
kit.
- Mount the rear tweeter on its own baffle as in Revision 2.
* A Conversion Kit 1A for magnet mounting is available from Wood Artistry.*
|
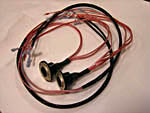 |
6 - Wire each driver to a terminal
strip at the bottom of the speaker cabinet.
* Alternatively, Wood Artistry can provide a
wiring harness with 8-pole Speakon connector4) and a
Speakon mounting bracket4).* |
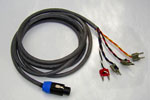 |
7 - Assemble speaker cables and
solder them to the driver terminal strip.
- Test correctness of driver polarity and cables electrically.
* Alternatively, speaker cables with Speakon connector and 4 dual banana plugs4) are available through
Wood Artistry.* |
 |
8 - Purchase electronic components, power supply
and chassis from DigiKey, Mouser or other suppliers.
- Detailed parts information is provided with the Construction Plans and on
its on-line Supplemental Information pages.
|
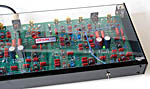 |
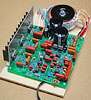
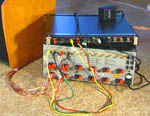
9 - Load components onto the ORION
ASP crossover/equalizer printed circuit boards by following the loading table in the
Construction Plans. Components are soldered from the backside. Mount boards into the chassis.
- Test the ASP electrically using signals from
the ORION Test CD and a DVM or ARTA.
- Soldering skills and the ability to fix mistakes are required
to successfully complete the ORION-ASP.
* Alternatively, a fully packaged and tested
crossover/equalizer4) is available from Wood Artistry.*
|
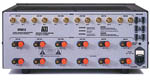 |
10 - Provide 8 channels of power
amplification of 40 W/channel minimum. Low distortion, low output
impedance, solid-state amplifiers are preferred.
* Alternatively, a well suited 12 x 60 W or a 6 x
180 W amplifier is available through Linkwitz
Lab.* |
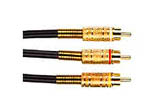 |
11 - Provide 2 unbalanced interconnects
to go between your preamplifier output and the ORION ASP input.
Provide 6 or 8 unbalanced interconnects between the ASP outputs and your power amplifier inputs.
|
 |
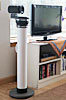
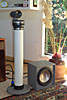
12 - Hook up loudspeakers, power amplifiers,
crossover/equalizer, preamplifier2) 3) and CD player.
- Test the complete system1)
sonically using the ORION Test CD.
|
| 1) The block
diagram shows the system hookup from CD/LP player to the ORION
loudspeakers. |
 |
2) If your preamplifier has balanced outputs,
then see FAQ 9 for proper connection to the ASP.
3) If neither an unbalanced RCA nor a balanced
XLR preamplifier output connection are available on your equipment, then you
could use the power amplifier output binding posts that hook up to your existing
speakers. In that case you would disconnect your speakers and then connect the
ORION crossover/equalizer to the binding posts via an attenuator. The attenuator
is very important to prevent damage of the crossover/equalizer input circuitry
from excessive power amplifier output signals.
 |
The attenuator is formed by a 1000 ohm, 1
W, metal oxide resistor and a 50 ohm, 1/4 W, metal film resistor. A pair
of twisted, insulated wires of necessary length connects the attenuator to
the RCA phono connector that plugs into the crossover/equalizer. Be sure
that the negative (-) binding post connects to the shield side of the
phono plug. All joints must be soldered except to the binding posts.
The power amplifier operates essentially into an open circuit and has its
lowest distortion in this mode. |
4) No soldering of parts is
required, if wiring harnesses and speaker cables with Neutrik Speakon
connectors, and an assembled crossover/equalizer are purchased.
-------------------------------------------------------------
Before you start with the project of building the ORION by
yourself, assess your range of capabilities realistically, to know what you
should buy ready-made. You might save yourself long hours of frustration. The ORION can also be purchased as a complete
system from Wood Artistry,
including all cables, interconnects and amplifiers, and ready to be plugged-in
to play. Wood Artistry sells and ships world-wide.
| Challenge | Requirements
| Supplies | Promotion | Subwoofer
| Photos | Reviews
| ASP | FAQ | Revision
0.1 | Revision 2 | ORION-3 |
ORION-4 |
|